Manage Tasks
The "Tasks" tab of the "My Project Work" panel lists all of the Project Tasks that you are attached to as a Resource. From here, you can perform quick actions on each of their Project Tasks.
Note: Keep in mind that the "Tasks" tab only displays tasks that the viewer is a Resource on. It does NOT display all of the Project tasks. To access all of the Project tasks, see either the Work Planner or the Task View.
Tip: Although Tasks that the viewer is a Resource on will automatically appear on the "My Project Work" panel, other tasks can be added. This is useful if a viewer would like to keep a close eye on a specific task; the task will always appear directly on their Project Home page.
To add another task to your "My Project Work" panel, go to the Task View and select Add to My Work List from a task's drop-down menu.

This page covers the following:
Changing the Percent Complete of a Task
The percent complete of any tasks can easily be modified on the "Tasks" tab. Simply click and drag the blue circle anywhere on the percent complete bar and click the Save icon ![]() :
:
Click image to play.
Alternatively, click the Cancel icon  to discard your changes.
Task Drop-Down Menu
The following actions can be taken on tasks from the task's drop-down menu:

-
Edit: This opens up the Edit Task Details window.
-
Complete: This will mark the task as complete; the task's progress bar will automatically set to 100%.
-
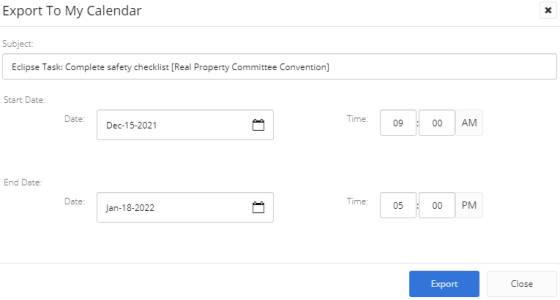
Export as appointment: This allows you to set aside time for the task by exporting it into your own personal calendar. The "Export to My Calendar" window will appear, allowing you to determine a name and time for you appointment:

After clicking the Export button, a calendar appointment file (.ics) will be downloaded onto your computer. This attachment can be opened by several calendar or email programs, including Microsoft Outlook, Google Calendar, and Apple Calendar.
Tip: The default start and end of the appointment is the task duration. However, you can adjust the appointment time to remind you when you should work on the task.
-
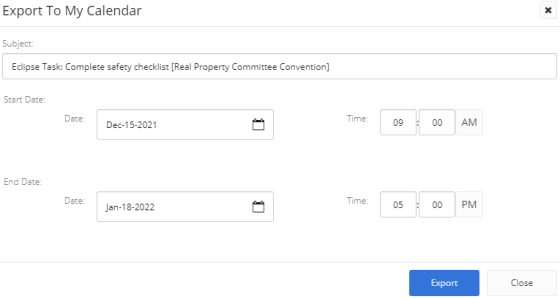
Export as meeting: This allows you to create a meeting for the task in your computer's calendar application. The "Export to My Calendar" window will appear, allowing you to determine a name and time for you meeting:

After clicking the Export button, a calendar meeting file (.ics) will be downloaded onto your computer. This attachment can be opened by several calendar or email programs, including Microsoft Outlook, Google Calendar, and Apple Calendar.
Tip: The default start and end of the meeting is the task duration. However, you can adjust the meeting time to remind you and others of when you should work on the task.
-
Send Comment to Team: This allows you to add a comment to the task. The comment will automatically mention every resource that the task is assigned to.
-
Add Comment: This allows you to add a comment to the task.
-
View Comments: This allows you to see all comments that have been attached to the task. From here, you can add your own comment by selecting the Add Comment button.
-
Remove from My Work: This will remove the task from your "Tasks" tab. This will not unassign you from the task.
Note: You can re-add the task to your work panel by selecting Add to My Work List from the task's drop-down menu on the Tasks page or the Project page.
-
Follow: This will add the task to your Following Panel. You will receive notifications whenever actions are taken on the task.
-
Open Project in New Tab: This will open the task's Project in a new browser tab.
